So I have been wanting to update my blog for sometime now, but I could never think of something good enough to write about. But today, I think I have something that you girls might want to read about! If you follow me on Twitter, Facebook, YouTube, or Instagram (all linked at the end of this post) you most likely have seen my photos and video. My hair is red!! Now I'm not talking about a subtle tint of red, I'm talking full blown Jessica Rabbit or Rihanna red hair! I couldn't be more pleased with how it turned out, so I decided to tell you all how I achieved it.
So I have been wanting to dye my hair red for quite a while. I've had my hair this color many times in the past, but it was always out of a box from the drugstore and I was never quite pleased with the way it turned out. I figured that I should start doing my homework to see how I could get my hair more red and how to make it last longer. I read blogs, watched YouTube videos, everything! Finally I came up with the perfect plan on how I was going to dye my hair.
Here's what you're going to need:
(everything I'm using, I purchased from Sally's Beauty Supplies)

- L'Oreal HiColor HiLights for Dark Hair Only in the shade "red" $6.00 (2)

- Any type of 30 volume developer. Mine was also from L'Oreal. $6.00

- A mixing bowl and tinting brush. About $5.00

- Some type of hair dying gloves. Mine was by the brand Graham Professional. About $4.00

- Riveting Red's color depositing shampoo and conditioner. About $7.00
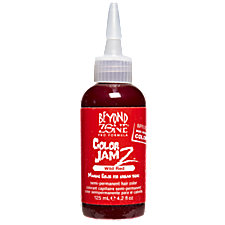
- Lastly, Beyond The Zone hair color in "wild red" (I purchased this for touch-up's when my red starts to fade. I DID NOT use this while coloring my hair for the first time.)
*****NOTE: I REPEATED THIS PROCESS 24 HOURS AFTER THIS FIRST PROCESS TO MAKE MY RED MORE VIBRANT AND TO EVEN OUT THE COLOR.
Preparation:
- You want to make sure that you HAVE NOT washed your hair in at least 24 hours.
- You want your hair to be free of any and all products. (hairspray, mousse, leave-in treatment, ect.)
- You want to cover your hairline, ears, neck, and anywhere else in those areas you think you might accidentally get hair dye with either vaseline or conditioner. This will make sure that the dye doesn't stain your skin and you don't look like you have blood all over you. (LOL)
Mixing the Color and Developer:
- You want to mix one part color (1.2 oz) and two parts developer (2.4 oz). Yes measuring is important! Trust me, I had a hard time measuring the developer.
- Make sure you mix it very well! You don't want there to be any chunks in there. I mixed mine with a fork for about a minute and a half, but you can also use a mini whisk. (they can be purchased at Sally's for about $3.00)
Once you've mixed the color you're ready to apply!
Applying the Hair Color:
- Make sure you have applied your gloves!
- Start at the ends of your hair and work your way up to the roots. Your roots are virgin hair, so they'll take to the color faster, and appear more vibrant.
- Make sure your whole head is covered!! You don't want to miss any spots and have red and brown splotchy hair! I actually had my mother help me with the backside, just to ensure that I didn't miss anything.
- Let the color set for 30 minutes to an hour. I let mine set for an hour because I have darker hair.
- Once your time is up, rinse hair with cold water. Avoid shampooing.
- You can apply a conditioning mask afterwards if you would like, but that's totally optional. I didn't.
- Avoid blow drying your hair to prevent any damage.
****NOTE: I REPEATED THIS PROCESS THE NEXT DAY TO MAKE THE COLOR MORE EVEN AND VIBRANT!!!!!!
And there you have it!!! Rihanna red hair!
Here's how mine turned out:
 |
| Before! |
 |
| After!! |
Tips To Keeping Your Hair Vibrant and To Prevent Fading:
- DO NOT wash your hair every day!!
- Make sure you use a cool/cold water temperature when washing.
- Use a color depositing shampoo and conditioner to refresh your color.
I really hope this helped everyone! If you have any hesitations DO NOT do this by yourself. Go to a professional. I don't want any of you to permanently damage your hair! Please feel free to comment down below, tweet me, or message me on YouTube or Facebook if you have ANY questions!
My links:
Facebook: http://www.facebook.com/sparklingbeauty1
Instagram: SpaklingBeauty17

